Use the Slider nodes when you want to allow users to change numerical values using a visual indicator between a minimum and a maximum value. As you move the knob along the trajectory the slider generates messages: drag started, drag finished, and value changed.
When a Slider node has focus use:The ← (Left Arrow) and → (Right Arrow) keyboard keys if the slider knob moves in a horizontal directionThe ↑ (Up Arrow) and ↓ (Down Arrow) keyboard keys if the slider knob moves in a vertical directionTo move a slider knob with keyboard keys, in the Properties you need to set the Step Value property for that slider to define how many steps the knob moves each time you press a key.
Creating a slider
To create a slider:
In the Assets window set Source to Factory Content.
Drag and drop the slider you want to add to your project to the Preview or the scene graph in the Project. Kanzi Studio creates a prefab from that slider and instantiates it in your project.
(Optional) In the Project > Prefabs select the slider and in the Properties set the properties so that the slider looks and behaves the way you need it to look and behave. For example, set these properties:
Maximum Value defines the highest value of the slider.
Minimum Value defines the lowest value of the slider.
Step Value defines the increment by which the knob moves on the rail.
Value property sets the initial position of the knob on the rail. If you do not set the Minimum Value and Maximum Value properties, the range is between 0 and 1.
Texture properties define the look of the knob and the rail.
Creating your own slider
When the sliders that come with Kanzi do not meet your requirements, you can create your own slider.
To create your own slider:
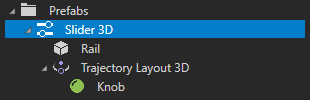
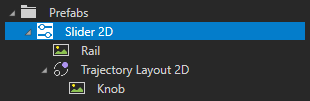
In the Projectpress Alt and right-clickPrefabs and select either Slider 3D or Slider 2D.
Right-click the slider node you created and create:
For a 3D slider:
A node that visually represents the rail along which the slider knob moves. For example, if you want to visualize the trajectory along which the slider moves, use a mesh.
Trajectory Layout 3D that acts as the rail along which you want to move the slider knob.
Inside the Trajectory Layout 3D create a node that you want to use as the slider knob. For example, create a Sphere.
For a 2D slider:
A node that visually represents the rail along which the slider knob moves. You can use an Image node or several Image nodes inside a layout. For example, create an Image node and name it Rail.
A Trajectory Layout 2D node that acts as the rail along which you want to move the slider knob.
Inside the Trajectory Layout 2D create a node that you want to use as the visual representation of the slider knob. For example, create an Image node and name it Knob.
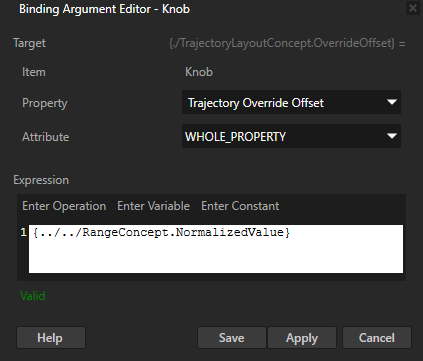
The trajectory of the trajectory layout works as the rail along which you can move the knob of the slider. Kanzi Studio creates and uses a circle trajectory by default. You can use an angle, arc, circle, ellipse, line, rectangle, spiral, spline, or a trapezoid trajectory. See Trajectories.
Select the node you want to use as the knob, in the Properties add the Bindings property, and in the Binding Argument Editor set:
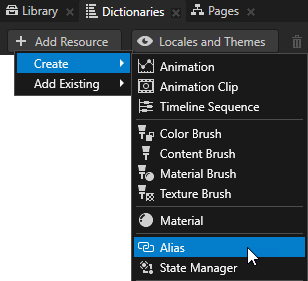
Create an alias that Kanzi uses to tell the slider which trajectory to use as the rail of the slider:
In the Project select Prefabs > Slider 2D, in the Dictionaries window click + Add Resource, and select Create > Alias.
Name the alias $layout and set it to point to the Trajectory Layout 2D node in the Slider 2D prefab. Kanzi uses this alias to tell the slider along which trajectory to move the slider knob.
Set the size of the rail along which the knob of the slider moves:
For a 3D slider: in the Library > Trajectories select the trajectory that the Trajectory Layout 3D node in the slider uses and set either the Length property of a Line Trajectory or the Radius property of a Circle Trajectory.
For a 2D slider: in the Project select the Trajectory Layout 2D and in the Properties set the Layout Width property.
(Optional) Select the slider and in the Properties you can set slider parameters by adding and setting:
Maximum Value defines the highest value of the slider.
Minimum Value defines the lowest value of the slider.
Step Value defines the increment by which the knob moves on the rail.
Value property sets the initial position of the knob on the rail. If you do not set the Minimum Value and Maximum Value properties, the range is between 0 and 1.
Drag the slider you created from the Project > Prefabs to the scene graph where you want to use the slider.
To create a Slider 3D node with a custom appearance:
// Create a Slider 3D node named Custom 3D slider.
Slider3DSharedPtr slider3d = Slider3D::create(domain, "Custom 3D slider");
// Add the Slider 3D node to the Scene node.
scene->addChild(slider3d);

// Set the size of the Slider 3D node to be 4 device independent units wide,
// 2 device independent units high, and 1 device independent unit deep.
slider3d->setWidth(4.0f);
slider3d->setHeight(2.0f);
slider3d->setDepth(1.0f);

// Use the Trajectory Layout 3D node to define the rail along which the knob of the slider moves.
// Create a Trajectory Layout 3D node named Slider rail.
TrajectoryLayout3DSharedPtr trajectoryLayout = TrajectoryLayout3D::create(domain, "Slider rail");

// Use the Sphere node to define the look of the knob that moves on the slider rail.
// Create a blue Sphere node named Slider knob whose radius is 1 device independent unit.
Model3DSharedPtr sliderKnob = Model3D::createSphere(domain, "Slider knob", 1.0f, 20, 20, ThemeBlue);
// Set the Sphere node to be the child of the trajectoryLayout Trajectory Layout 3D node.
trajectoryLayout->addChild(sliderKnob);

// Add the layout as a child node of the Slider 2D node.
// You can place the Trajectory Layout 2D node that defines the rail anywhere
// in the scene graph and it does not have to be the direct child of the Slider 3D node.
slider3d->addChild(trajectoryLayout);

// The knob movement on the rail is based on modifying the TrajectoryLayout3D::StaticTrajectoryOffsetProperty
// which is set based on the Slider3D::ValueProperty.
// "../.." is the path from the knob (Sphere node) to the Slider 3D node.
BindingSharedPtr binding = Binding::create(domain, "../..", Slider3D::ValueProperty,
    PropertyFieldWhole,
    TrajectoryLayout3D::OverrideOffsetProperty,
    PropertyFieldWhole);
// Add to the knob the binding that enables the knob to move on the rail.
sliderKnob->addBinding(binding);

// Create an alias pointing to the Trajectory Layout 3D node that defines the slider rail.
ResourceID alias("$layout");
string path("obj:///" + trajectoryLayout->getName());
// Add the alias to the resource dictionary of the Slider 3D node.
slider3d->addResource(alias, path);

// Create the trajectory of the Trajectory Layout 3D node that is used as the rail of the Slider 3D node.
// Create a line trajectory on the x axis, that is 5 device independent units long, and name it Line trajectory.
TrajectorySharedPtr trajectory = Trajectory::createLine(Vector3(), Vector3(1.0f, 0.0f, 0.0f), 5.0f, domain, "Line trajectory");
// Set the Trajectory Layout 3D node to use the line trajectory.
trajectoryLayout->setTrajectory(trajectory);

// Set the Trajectory Layout 3D node so that it sets its size
// based on the size of its parent node (in this case the Slider 3D node).
trajectoryLayout->setHorizontalAlignment(Node::HorizontalAlignmentStretch);
trajectoryLayout->setVerticalAlignment(Node::VerticalAlignmentStretch);
trajectoryLayout->setDepthAlignment(Node::DepthAlignmentStretch);
To create a Slider 2D node with a custom appearance:
// Create a Slider 2D node named Custom 2D slider.
Slider2DSharedPtr slider = Slider2D::create(domain, "Custom 2D slider");
// Set the size of the Slider 2D node to be 400 pixels wide and 200 pixels high.
slider->setSize(400.0f, 200.0f);

// Use the Trajectory Layout 2D node to define the rail along which the knob of the slider moves.
// Create a Trajectory Layout 2D node named Slider rail.
TrajectoryLayout2DSharedPtr trajectoryLayout = TrajectoryLayout2D::create(domain, "Slider rail");

// Use the Image node to define the look of the knob that moves on the slider rail.
// Create an Image node named Slider knob.
Image2DSharedPtr knob = Image2D::create(domain, "Slider knob");
// Set the Image node to be the child of the trajectoryLayout Trajectory Layout 2D node.
trajectoryLayout->addChild(knob);

// Create an alias pointing to the Trajectory Layout 2D node that defines the slider rail.
ResourceID alias("$layout");
string path("obj:///" + trajectoryLayout->getName());
// Add the alias to the resource dictionary of the Slider 2D node.
slider->addResource(alias, path);

// Add the layout as a child node of the Slider 2D node.
// You can place the Trajectory Layout 2D node that defines the rail anywhere
// in the scene graph and it does not have to be the direct child of the Slider 2D node.
slider->addChild(trajectoryLayout);

// Create the trajectory of the Trajectory Layout 2D node that is used as the rail of the Slider 2D node.
// Create a line trajectory on the x axis, that is 350 pixels long, and name it Line trajectory.
TrajectorySharedPtr trajectory = Trajectory::createLine(Vector3(), Vector3(1.0f, 0.0f, 0.0f), 350.0f, domain, "Line trajectory");
// Set the Trajectory Layout 2D node to use the line trajectory.
trajectoryLayout->setTrajectory(trajectory);

// Set the Trajectory Layout 2D node so that it sets its size
// based on the size of its parent node (in this case the Slider 2D node).
trajectoryLayout->setHorizontalAlignment(Node::HorizontalAlignmentStretch);
trajectoryLayout->setVerticalAlignment(Node::VerticalAlignmentStretch);

// The knob movement on the rail is based on modifying the TrajectoryLayout2D::StaticTrajectoryOffsetProperty
// which is set based on the Slider2D::ValueProperty.
// "../.." is the path from the knob (Image node) to the Slider 2D node.
BindingSharedPtr binding = Binding::create(domain, "../..", Slider2D::ValueProperty,
                                                           PropertyFieldWhole,
                                                           TrajectoryLayout2D::OverrideOffsetProperty,
                                                           PropertyFieldWhole);

// Add the Slider 2D node to the Viewport 2D node.
viewportNode->addChild(slider);

// Get the knob instance from the instance of the prefab template.
Node2DSharedPtr knobInstance = slider->getPresenter()->getLayout()->getChild(0);
// Add to the knob the binding that enables the knob to move on the rail.
knobInstance->addBinding(binding);